
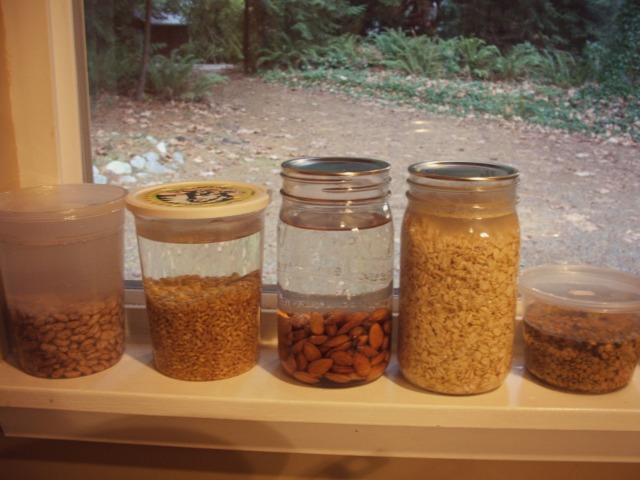
what my windowsill looks like currently
At any given time, if you walk into my kitchen you are likely to see things floating in jars in my windowsill. Ever since I began to make more things at home, it seems I am always soaking or sprouting something.
During lent last year, we (Jeremy and I – the kids diet didn’t change too much during this time) didn’t have any grains, meat, or dairy during the week, and so we found ourselves eating more beans than usual. And after lent, when we decided to continue to keep meat our of our diet, we continued to eat beans.
At first, we bought them canned, but the convenience of a can has become not worth the expense or some of the preservatives added to them, not to mention the chemicals which can be leached into the food from the can itself. Also, buying dry beans in bulk meant less packaging and that we could store more on hand at one time, meaning less trips to the store. I thought soaking beans was going to be way too much work, but once I started doing it, it became a normal weekly routine that is quite easy to keep up now (with a little planning). Beyond just the price and reduction of waste, preparing my own beans has shown to have other benefits as well.
After soaking beans, I began to hear about sprouting, and wondered what the point in all of that was. I found myself learning some interesting facts about the level of lectins in conventionally prepared foods, which I had not previously known. They are highest in grains, legumes, nuts, nightshades, and dairy. Lectins are proteins that the human body is not able to digest, and they can cause problems with our digestive system. While they are present in all plant and animal foods, traditional ways of preparing foods (such as soaking and fermenting) aid the human body in digestion. “In our contemporary dietary culture, however, we too commonly skip these practices yet rely on the highest lectin-containing foods for our primary food sources.” (source – click to read more about lectins)
This information caused me to become a little concerned, because as vegetarians, our diet heavily relied on grains, nuts, and beans. I began to ask myself, “How could I eliminate these foods from our diet?” and “ Is that even the answer? How damaging are these to our bodies, really?” People have been eating grains for a long time, and this is a continual area I am learning and making adjustments in. I am in no means an expert. For a while, we were gluten free, and I even tried keeping us grain free for a few weeks, but it took a lot of work and planning.
So, for now I am just focusing more on where I am getting our food from, how I am preparing it, and the amount we are eating. This is one of the biggest reasons we try to stay away from processed foods – I don’t know exactly how it was prepared, and most likely, it was in a way that does not make the nutrition as available or safe for our bodies as preparing it ourselves.
So, I feel that the best I can do at the moment is buying as locally as possible from organic providers and soaking and/or sprouting our grains, nuts, and beans, prior to cooking them. I have also tried to plan some meals during the week which reduce our intake of foods such as breads, beans, and nuts. When you sprout beans and grains, you not only break down lectins and other anti-nutrients, making the food easier to digest, but also, the nutrients become more bio-available to our bodies. If you want to read more about the why and how of sprouting, I suggest visiting this site. I am a lazy sprouter, and generally rinse my beans once or twice a day (I have gone longer, and have had no problems, but most say to rinse more often).
And, keep in mind, when I first began to read about sprouting beans, I thought, “yeah right, who in the world has time for that?” And it took a few months for me to begin to try sprouting. Even now, I still forget to do it at times and we end up with meals that are less than ideal.
But, the goal isn’t to live forever.
It is all steps forward and backward, simply trying to do my best to take care of our family and learn a healthy balance.
Now, on to the recipe I said I would share!
Garbanzo beans are our main bean around here. They don’t take long to sprout, are versatile, and my kids love them. We either make hummus with them or we roast them and eat them hot, or chill and add to salads. While I’m not a fan of veggie meat-mimics trying to taste like a burger, I still have enjoyed making bean “burgers” and even breads using bean paste. In the summer, I cooked up a lot of black bean burgers. My son didn’t like the color of them, however. This is when I started playing around with garbanzo beans, after realizing they are closer in color to chicken nuggets (a previous favorite). And so, we found a new favorite: Chickpea Nuggets. Although there is no fooling these kids into thinking they are really chicken nuggets, they always get excited when I make them.
Whats great about these is that you can sprout a bunch of beans, make them up, pre-cook, and freeze. Then we just pop them in our toaster oven for 10 minutes or so and lunch is served! I am not an “exact” recipe kind of girl. I make most things by trial and error and put “about this much” in something and change depending on what I have on hand or what I feel like making. Hopefully this can be sort of a guideline for you to experiment!
Chickpea Nuggets
Yield: about 35-40 nuggets, depending on the size you make them.
2 cups soaked and sprouted beans – usually I cook and chill them before using them, this time I put them straight into food processor, and they turned out fine.
2 cups large pieces of brocolli stalks (or whatever vegetables you happen to have on hand. Carrots and cauliflower work great too – you can also omit the veggies and add more coconut flour or even sunflower seeds works for a more nutty flavor).
seasonings – I add some sea salt, garlic, and bouquet garni. I also sometimes squeeze in some mustard and add a pinch of turmeric. Go with what spices you like! make sure you add enough though – unless you cook the beans and then flavor them, they won’t have much flavor at all.
1 – 2 large tbsp. coconut flour (or other flour of choice. Almond meal would be a good choice, since it uses such a small amount.)
1 – 4 large tbsp. tapioca flour or arrowroot powder
1- 2 tbsp. water

after one day of soaking
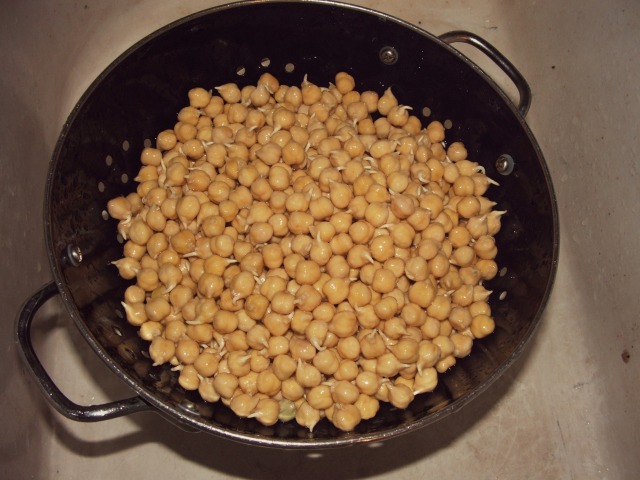
rinse out your sprouted beans. This is the length of sprouts I usually go for – about 3 days.

measure out about 2 cups of your broccoli stalks (or other vegetables)

run your veggies through your food processor for a few minutes until it looks like this

add your beans and seasonings and turn back on the food processor. Add the coconut flour and tapioca or arrowroot powder. If it looks too dry, add a little water, or if too wet, add more tapioca powder. Careful with the coconut flour, as a little goes a long way in absorbing liquid. I ended up adding about 4 tbsp. of tapioca powder. The goal is for it to be able to form into a nugget sized patty and keep its shape.

Form your nuggets and put on a plate. Try not to make them too big – the more surface area that touches the pan, the better. I usually put these in the fridge or freezer until I’m ready to cook them, but I did some at room temperature, and they held up just fine. If yours are falling apart, you may want to chill them for a while. If you make these burger sized, then you will definitely want to chill them so they hold together better.

preheat your pan to a high heat, and then lower the burner to med-high. I use our cast iron. If you use a pan with oil, be sure to use one that works well with high-heat (palm and coconut oil are my favorites). Add your nuggets and let cook for 30 seconds – 1 minute, until brown. You may have to play around with the timing a bit. I also squish them down when I put them on to get more of it crispy.
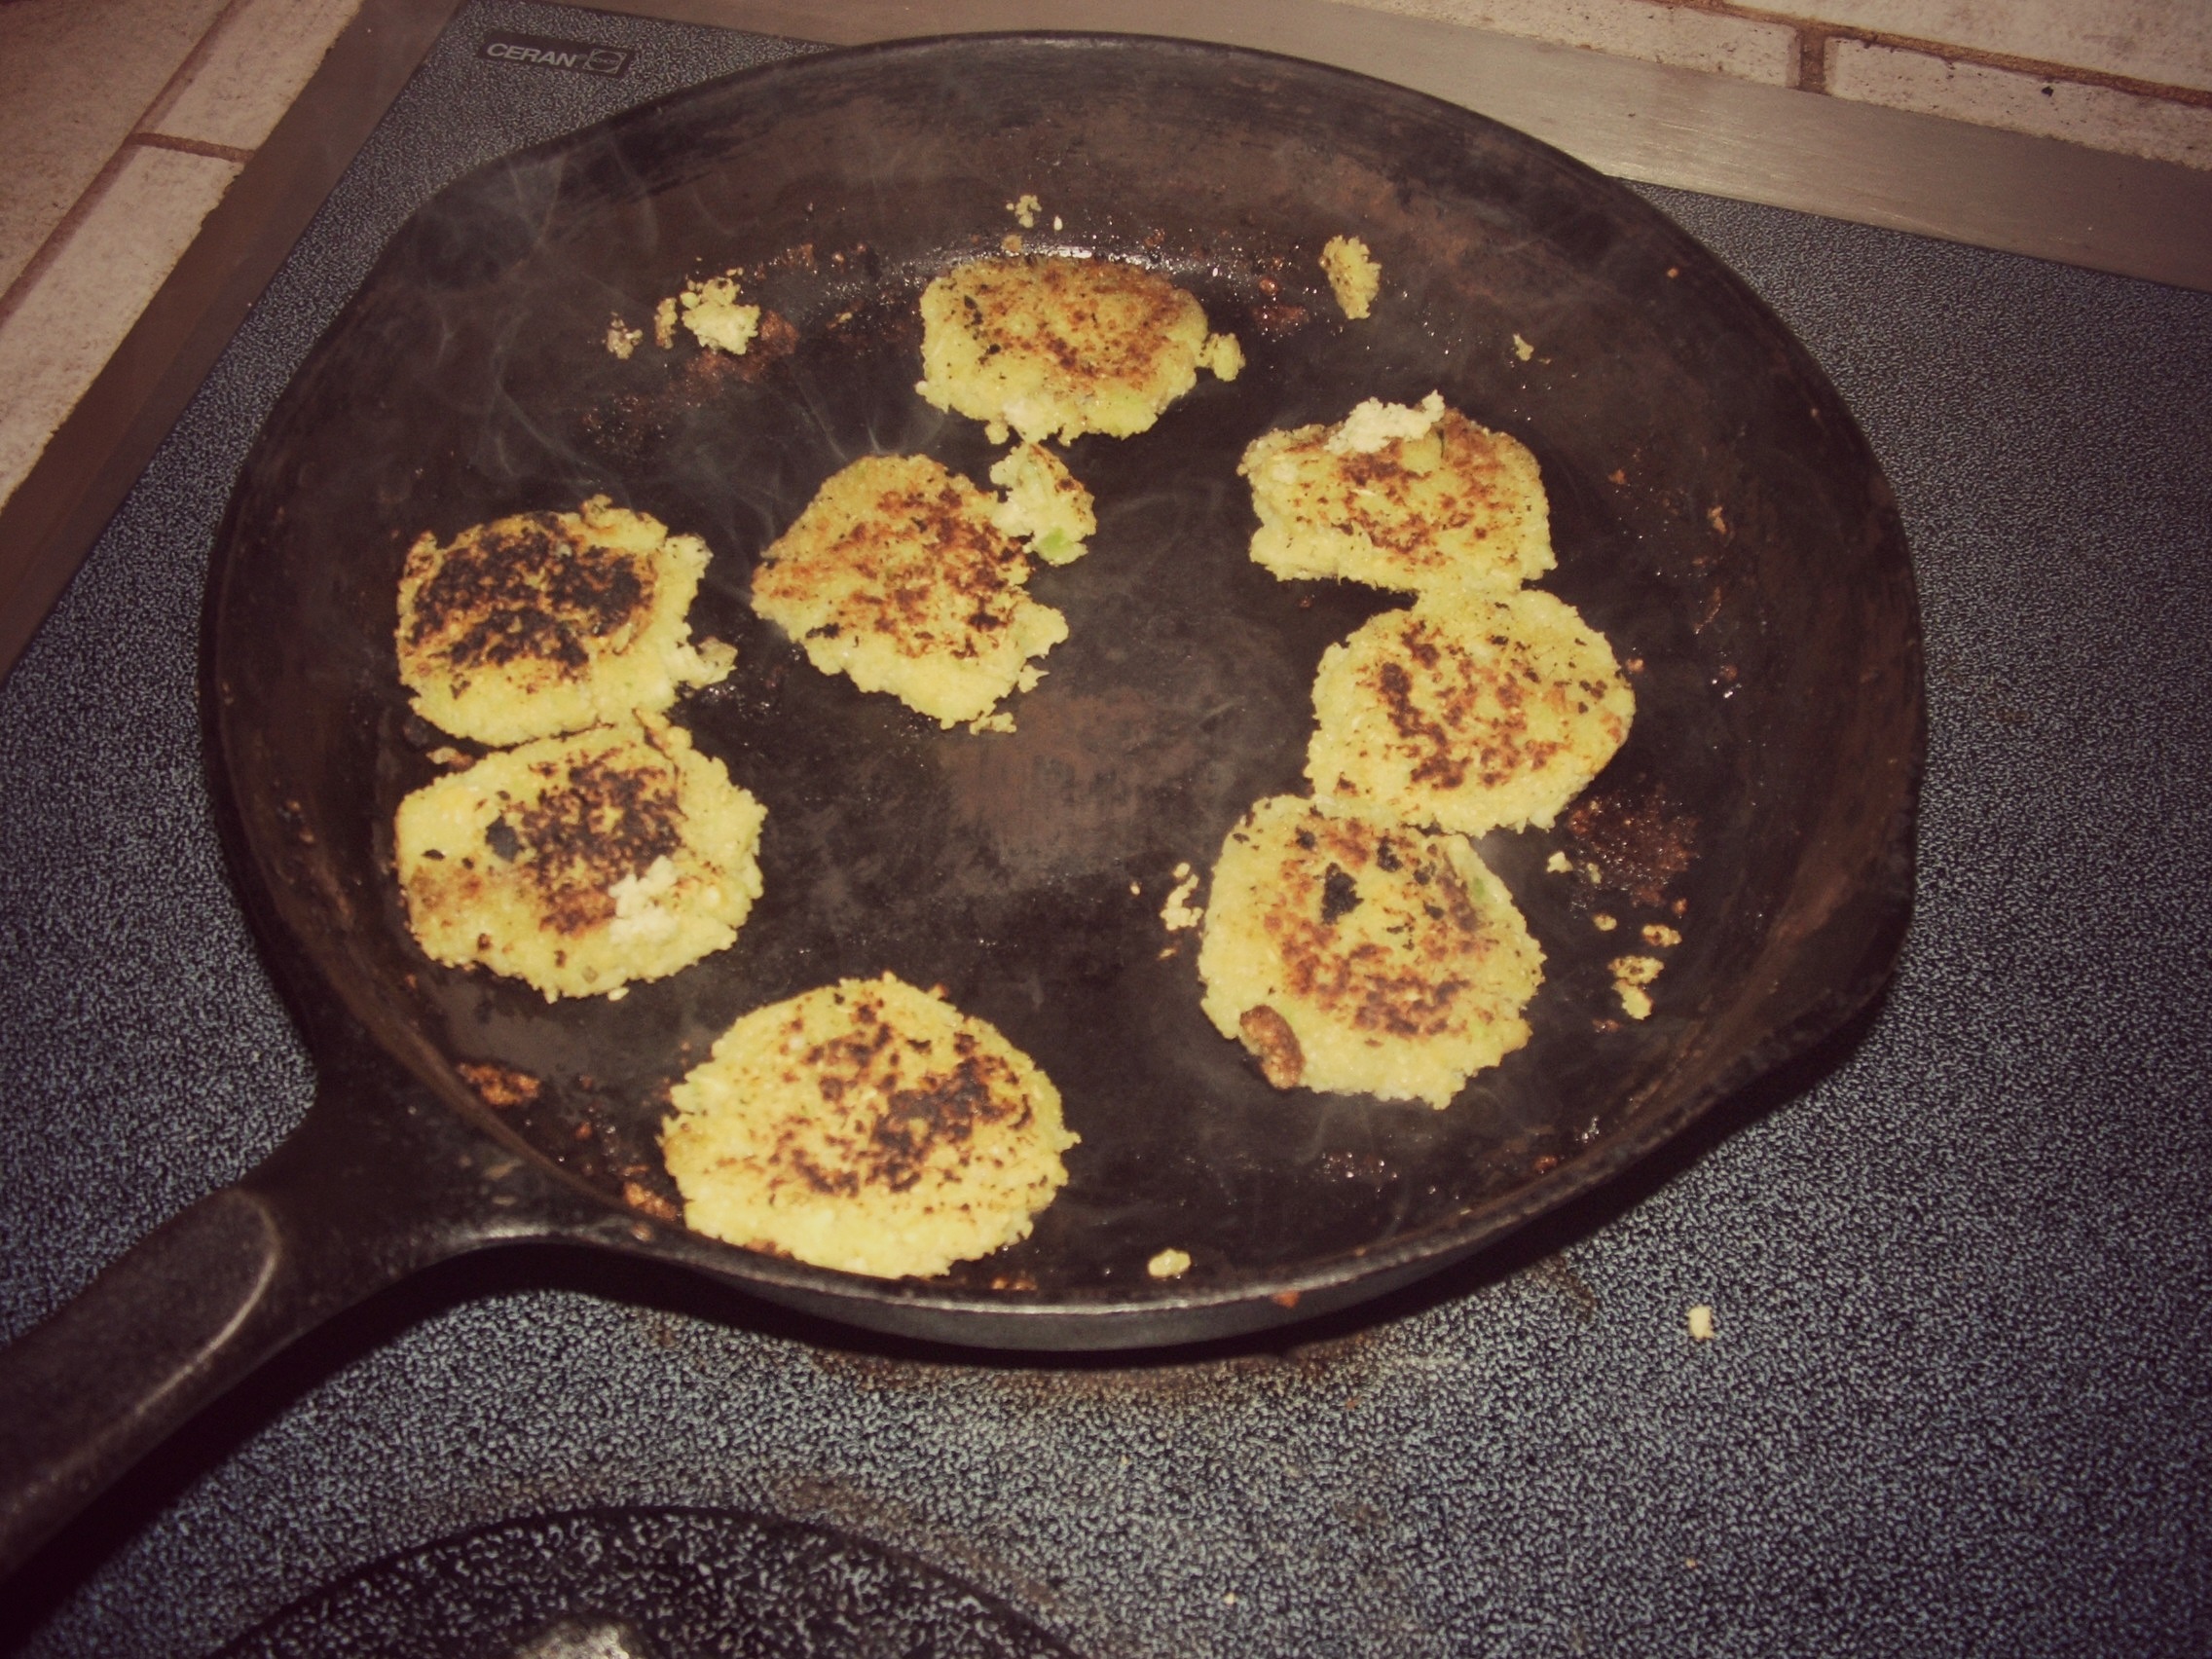
When you flip them over, they should look nice and and brown and crispy.

And there you have it! A plateful of chickpea nuggets. Cook up a few batches and freeze them. Try different seasonings and see what your family likes the best!

Now, here is a happy meal you can feel good about serving! We love to have these along with some homemade sweet potato fries.
